Falling in Love with Fire Features

Landscape Construction

Fall is arguably the most beautiful time of year in northern New England, and so it makes sense that many of us want to extend our time outside and enjoy the great weather, beautiful foliage, and cool nights that this season brings.

One way to add to the enjoyment of staying outdoors as the temperatures dip is to add a heating element to your outdoor spaces. You can add a decorative touch as well as a heating option by choosing a fireplace or fire pit. Both are wonderful additions to your outdoor areas and put out about the same amount of heat but have different things you should consider.

A Heated Focal Point

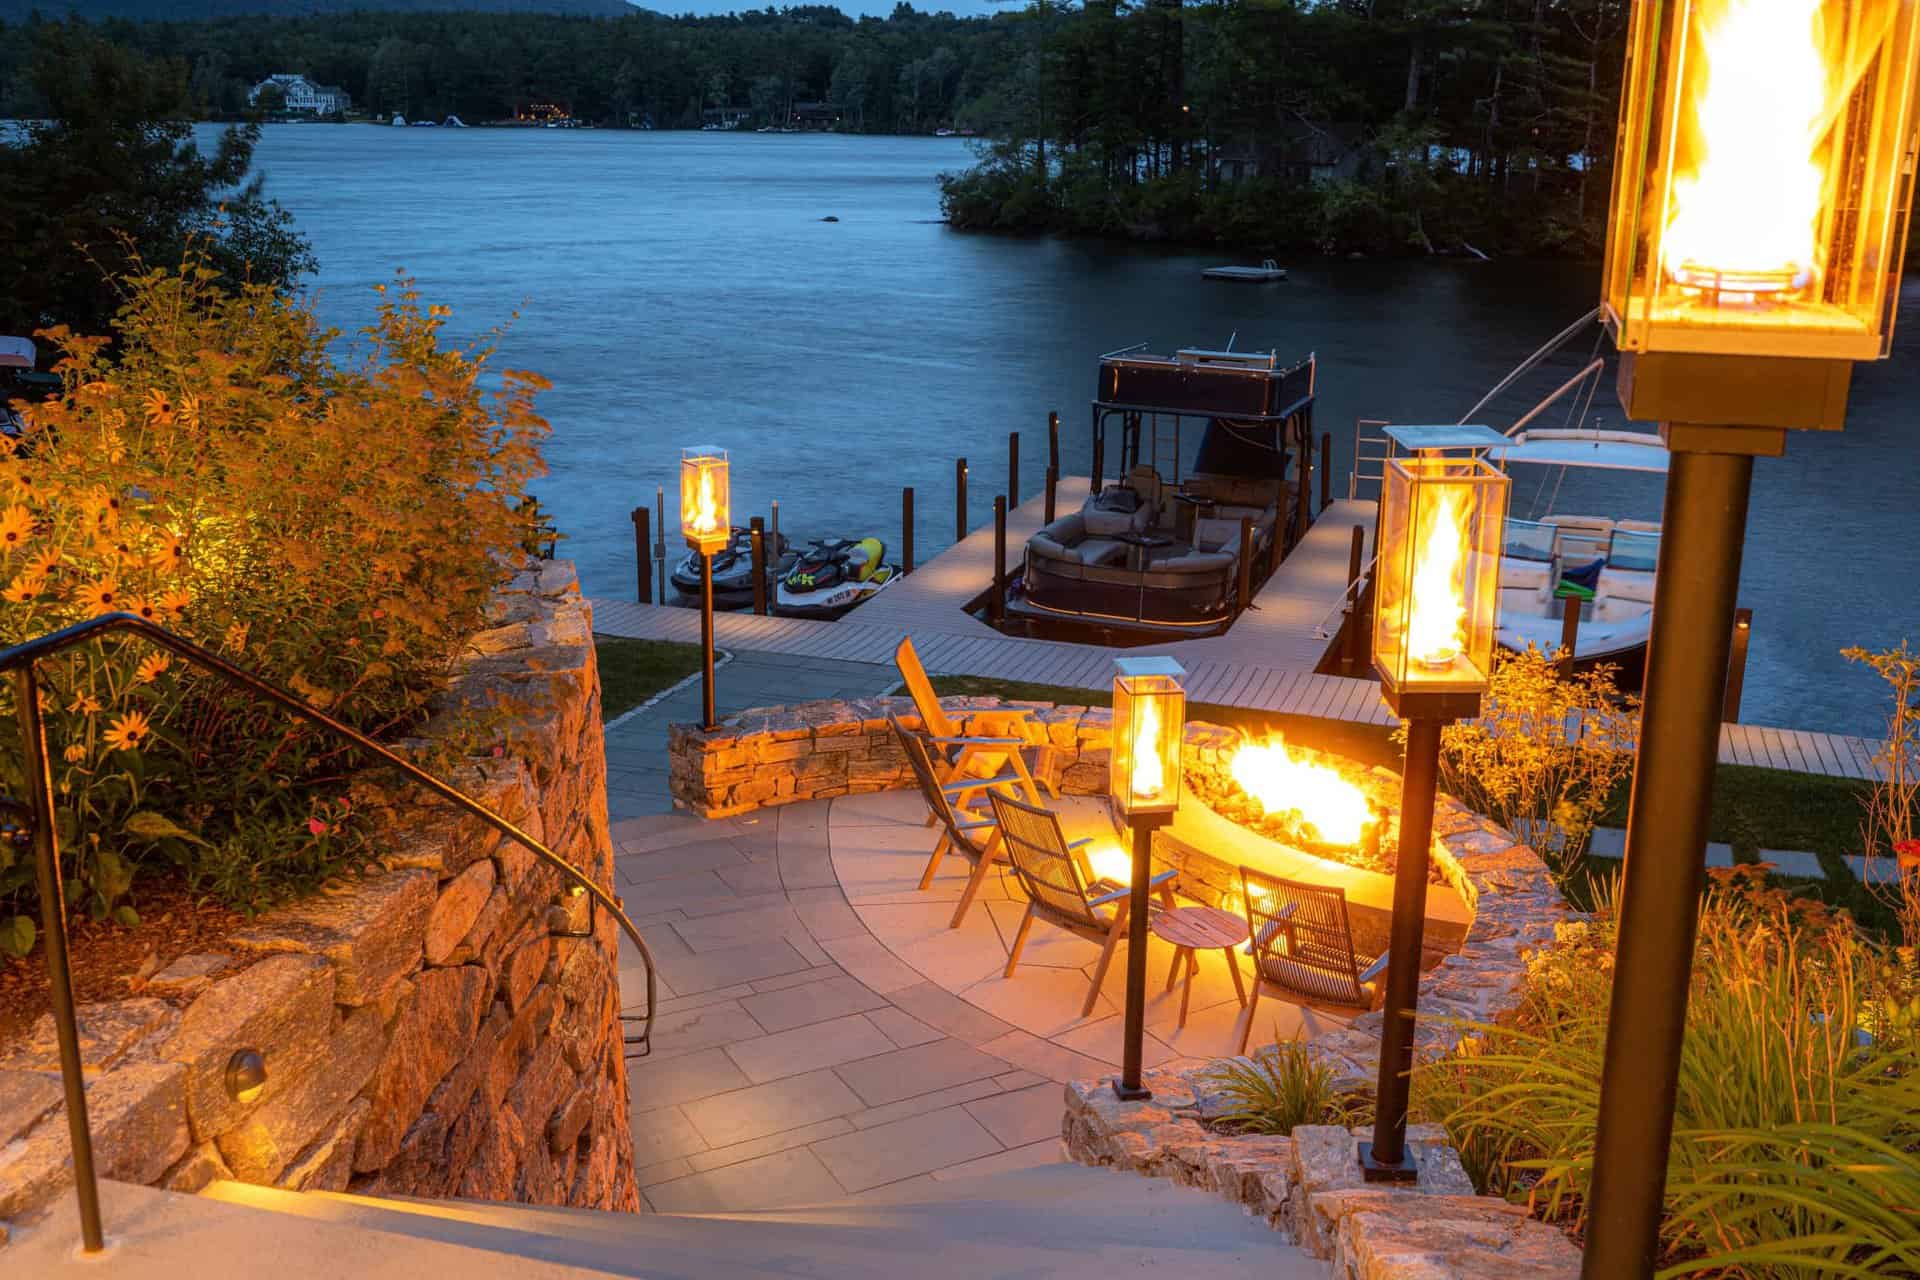
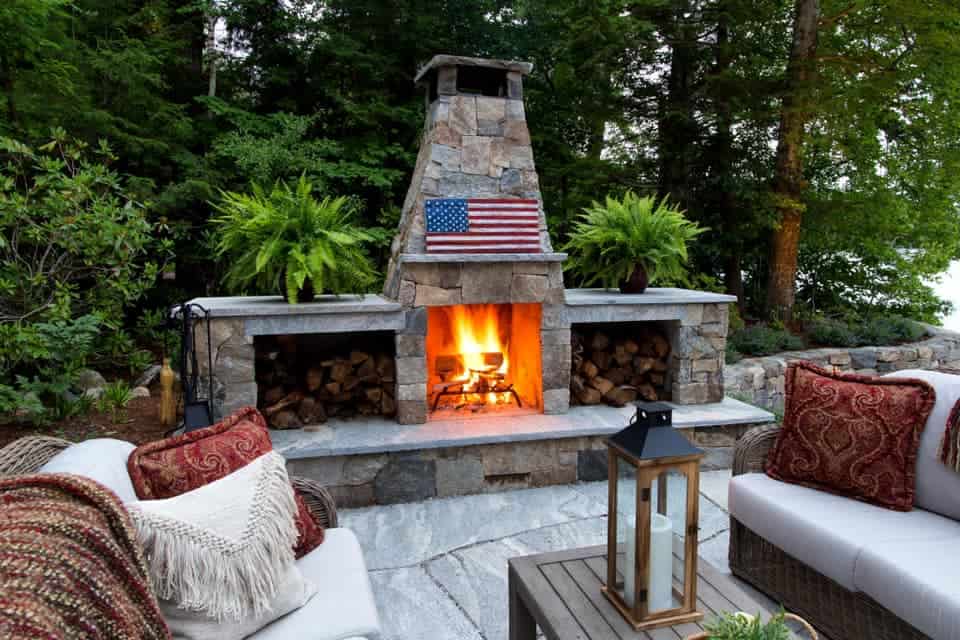
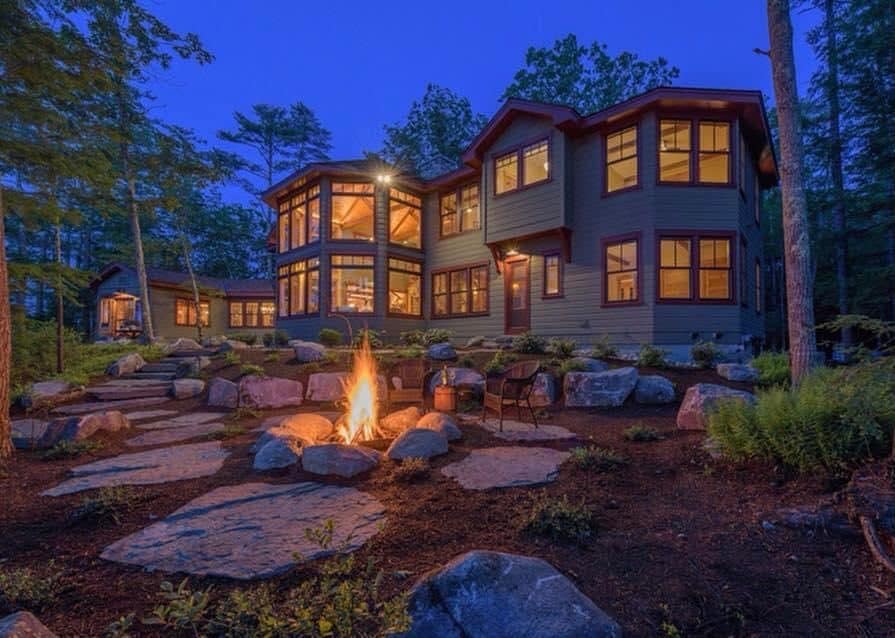
When you install a fireplace or fire pit on your property, it becomes a focal point of your landscape and a natural gathering spot that’s perfect for entertaining and socializing with family and friends. It’s a casual place to hang out and chat or unwind after a long day. It’s easy to sit around a fire and sip cocktails or roast marshmallows to make s’mores (or both!).

A fire element adds warm tones of light to your landscape and provides a good “wall” at the end of a patio or seating area, especially if you install a fireplace. A fire pit can help you create a new seating or conversation area if you want to break up a large expanse of lawn or use a previously unused/underused corner more efficiently. A more permanent fire element, like built-in fireplaces or fire pits, can increase your property value as well.
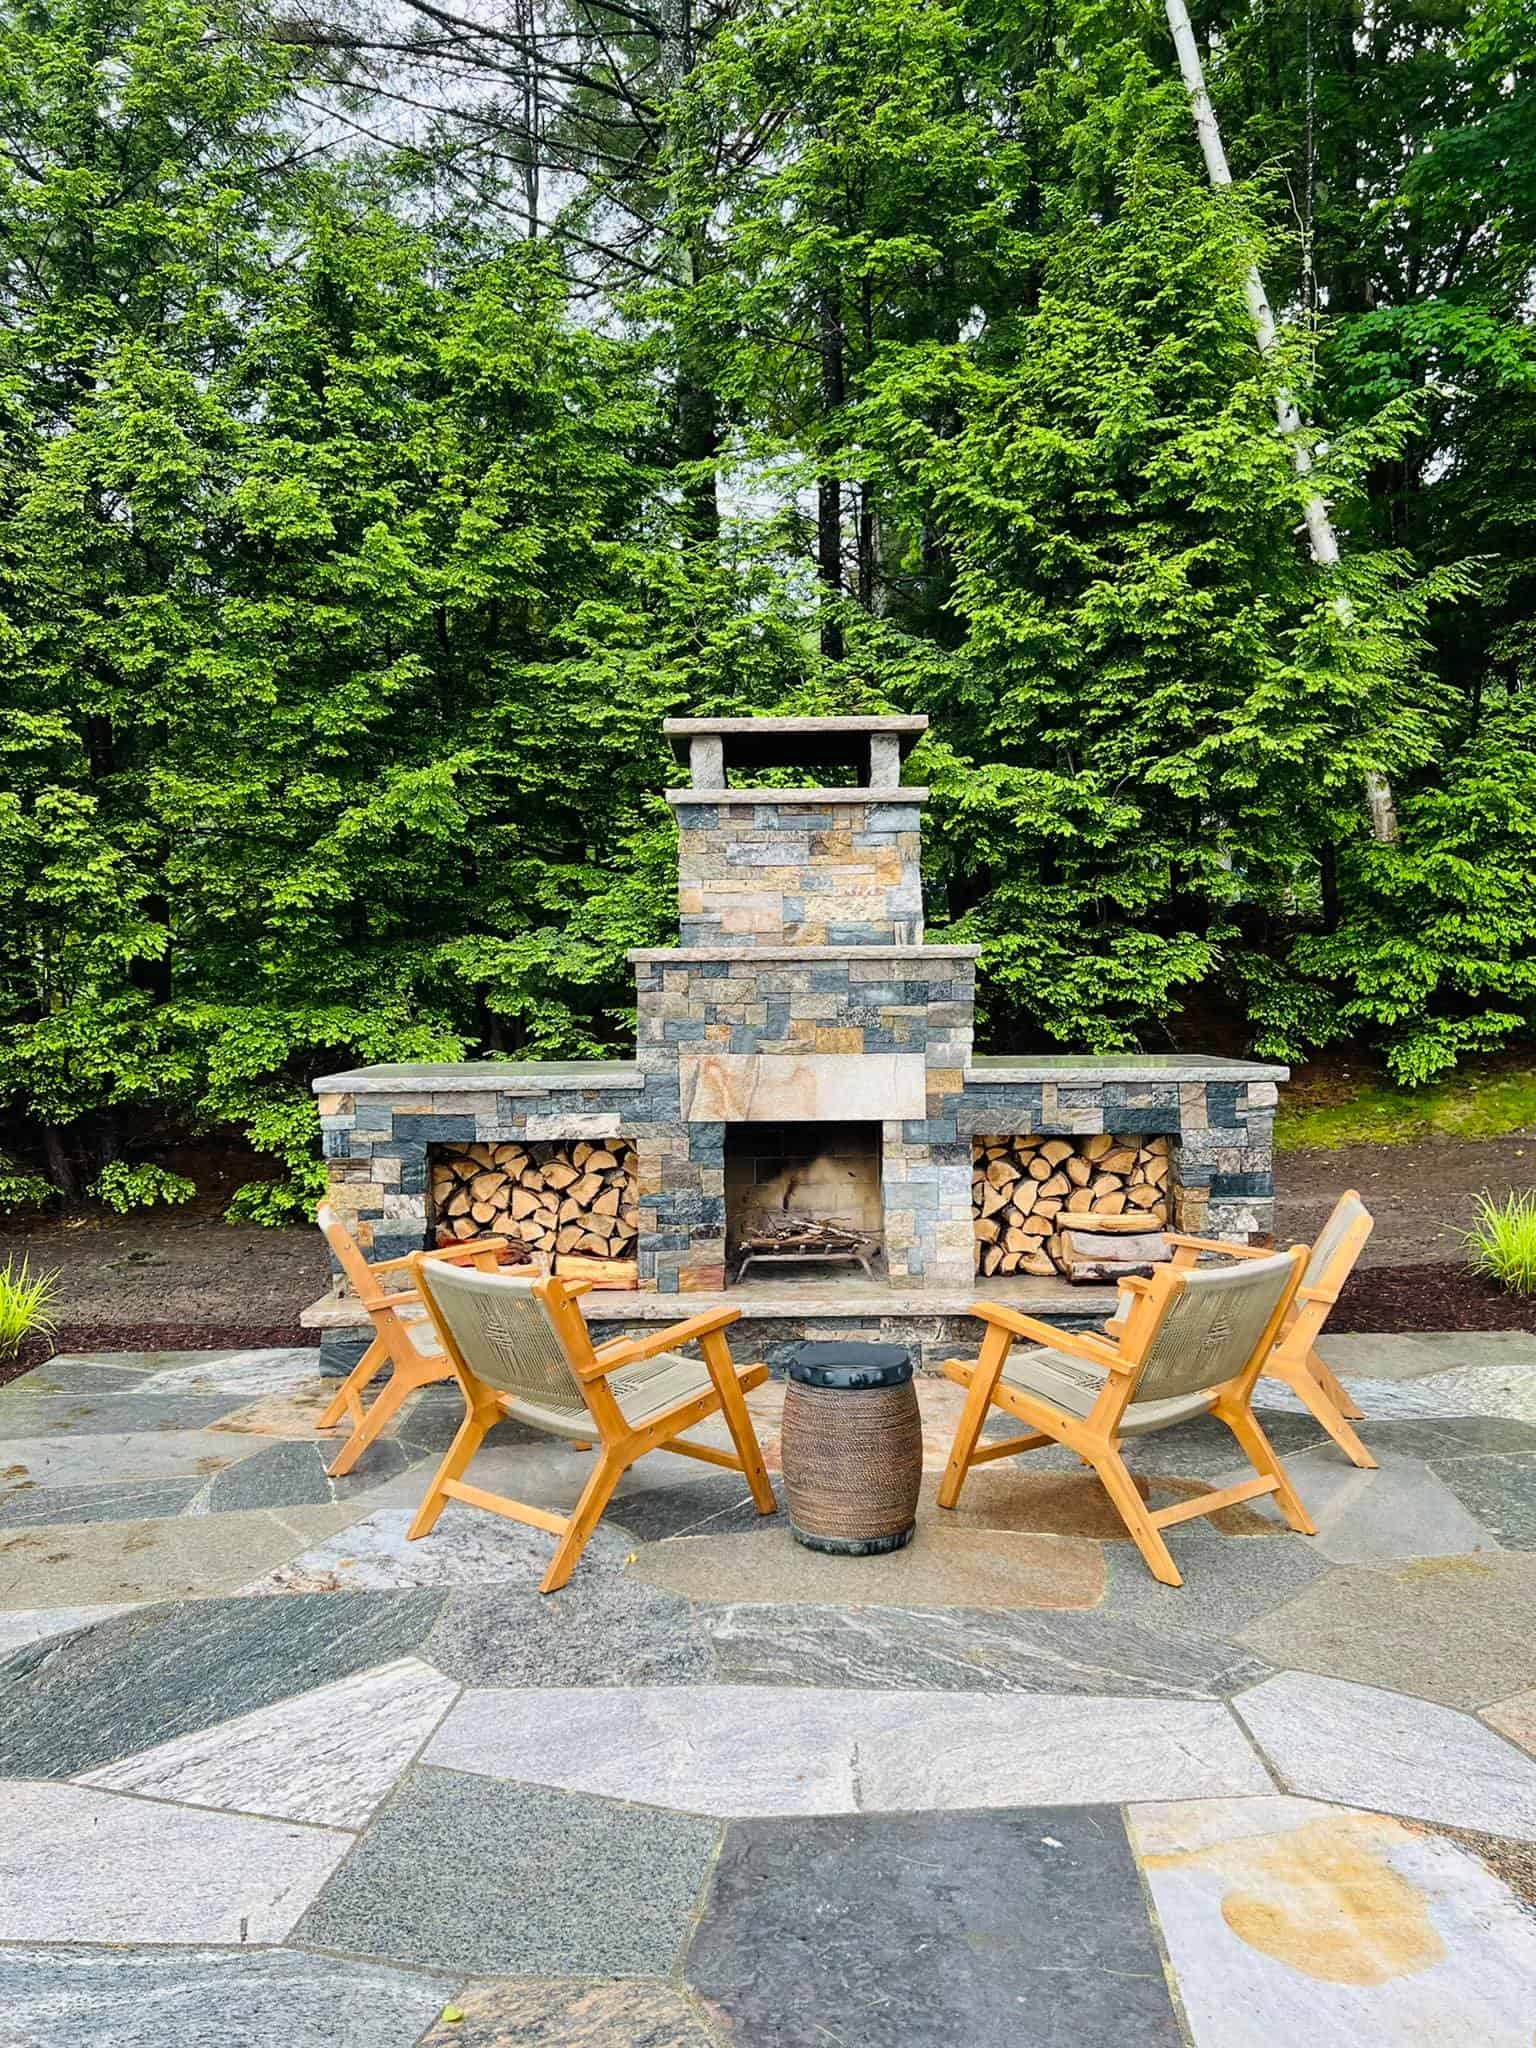
Fireplaces

By matching or complementing existing masonry to your fireplace addition, you’ll extend your patio and entertainment space. You can opt for a wood-burning fireplace, or if you already have gas as a heating or cooking element in your house, it’s not difficult to have a gas line run outdoors for a fireplace. When installing an outdoor fireplace, just make sure to build one with a large enough chimney to be able to get a good draft for ventilation.

Firepits

Sitting around a fire pit evokes almost the same feelings as gathering around a summer bonfire on the beach or a campfire in the woods. Usually circular or square in design, a fire pit allows people to gather around all sides. Fire pits can be portable or built into patios as a permanent fixture.

Fire pits have several options to fuel their fires. Wood is traditionally used in fire pits and provides a nice flame and heat. With open wood fire pits, wind is a consideration. When placed in a windy location, the smoke produced by traditional wood burning fire pits can shift onto you, your guests, or toward your house at times. Debris and dirt may be more visible, and you may need to drain rainwater from it often. With wood, you’ll need to have storage nearby to keep your wood dry.

Great Fire Pits

If you are warm to the idea of wood-burning fire pits, there are some smoke-free options. Two companies we recommend are:

  • Solo Stove: This portable firepit offers a great burn with almost no smoke. It’s designed to maximize airflow and has air vents placed in strategic areas. You may get a little smoke when lighting or putting out the fire, but that’s about it. The trick is to keep wood below the secondary air vent and not overfill it, then you’ll enjoy a great fire without being bothered by smoke.
    Their stainless-steel design fits well into any décor and allows for easy cleaning. They also offer a lifetime guarantee from any manufacturing defects. Solo Stove also makes a matching pizza oven.
  • Breeo fire pits are another company that offers smokeless, portable fire pits. Breeo’s pits come in several design, glass, and color options. You can even custom design your fire pit on their website, so it’s built to your own specifications. Breeo’s fire pits are smokeless due to raised air vents on the bottom of the pit, enabling oxygen to feed the fire regardless of ash build up. Their double-walled build allows hot air to enter from vents at the bottom and escape at holes in the rim at the top. This escaping air causes a secondary ignition of flames, burning off the rising smoke.

Breeo also offers accessories like fireside furniture and implements you can use to cook directly on the flames themselves. As with all fire pits and fireplaces, make sure to clean all debris, drippings, and food particles completely off before relighting the fire.

Other Fuels for Fire Pits

Propane and gas fire pits are other options for fueling fire pits if you don’t want to bother with wood. Both gas and propane fire pits have instant ignitions, so you don’t have to mess about getting a fire started. And both can be shut down instantly without waiting for flames to die down or embers to cool.

There are no sparks emitted from a gas or propane fireplace, so these types of fire pits can be a safer option. To avoid carbon monoxide build up, both gas and propane fire pits must be used in well-ventilated areas.

We’ve helped many homeowners add a fire and heating element to their landscapes and outdoor entertainment spaces, and we’d love to help you come up with ideas to incorporate a fireplace or fire pit into your property. Please call us at 603.707.0630 or email us to get started.

Love for Outdoor Kitchens

Landscape Design

Hot weather has come to New England, and we, of course, want to spend as much time as possible outdoors. And we certainly don’t want to heat up our kitchens and our houses while we cook. A great way to remain part of the summer fun and help beat the summer heat is to install an outdoor kitchen.

Outdoor kitchens have progressed beyond having a BBQ grill and mini fridge tucked away in the corner of the yard; many standard kitchen appliances are available in models that can be installed outdoors, so you can customize and design a kitchen that will truly fit your family’s needs and your home’s space and décor. Adding a beautiful and well-equipped kitchen greatly increases a property’s value; some homes have seen a return on investment of 100%-200%.

Create a Plan

Once you’ve decided an outdoor kitchen is right for you, you need to start by figuring out what you primarily want to do in this kitchen. It’s easy to get carried away while dreaming and designing, and as with every renovation, the costs can add up quickly.

Think about how your family eats, and how much you entertain. Will you need a brick pizza oven, or will a steel one do? Or do you need a pizza oven at all? Will you need taps in your wet bar, or will a built-in ice chest for chilling beverages suffice? A large grill is great, but will you need a roasting spit? Do you need a small grill or fridge, or larger ones?

There are so many appliance choices available, so taking time to think about how you use your outdoor space is really the best first step. You can fill your shopping list with “must haves” from there.

Choose a location

Think of an outdoor kitchen as an extension of your indoor kitchen. It should be located close to your indoor kitchen, if possible, to make the inevitable trips indoors to grab ingredients, pots and pans, etc., easier on the chef. The kitchen should be designed to keep the chef part of the outdoor activities, so as you’re choosing your location, allow space for seating in and around the kitchen area itself.

Consider how this kitchen will fit into your décor. Ideally, you’ll want this kitchen to be built with any stonework that already exists around your home, so you can match or complement the patio tiles or wall masonry. Will you be able to extend your roofline to cover this kitchen, or would you prefer this kitchen to be under an awning or located in a pergola or separate structure? The kitchen’s location would be best situated in a spot that’s at least partially shaded and away from the wind, to make it a comfortable spot for cooking, eating, and entertaining.

Kit it Out

Once you’ve thought about what you want to do with the space you’ve chosen, how your family eats, and how you want to entertain, now, it’s time to go shopping. There are so many choices available for outdoor kitchens when it comes to appliances and fixtures. Here are some quick “shopping” lists to help you consider:

Cooking

  • BBQ Grill
  • Pizza Oven
  • Roasting Spit
  • Smoker
  • Warming Drawers
  • Gas Side Burners
  • Gas Griddles
  • Hood Vent
  • Proper venting for Gas Appliances

Cooling

  • Refrigerator
  • Ice Drawers or Bins
  • Wine Chillers/Fridges

Wet Bar/Beverage Center

  • Sink
  • Blender
  • Kegerators
  • Taps

Standard Kitchen Necessities

  • Countertops/Prep surfaces
  • Sink
  • Dishwasher
  • Storage Cabinets, Drawers and Shelves
  • Trash/Recycling
  • Pantry Storage
  • Compost Bins

Entertainment & Comfort

Material Considerations

Choosing the materials for your outdoor kitchen build is like designing your indoor kitchen, but with one extra consideration: this kitchen must withstand the elements across all four of New England’s seasons. During the hot summer months, you must be able to touch surfaces without getting burned, and surfaces must be able to withstand the cold, snow, and sometimes abrupt changes in temperature we experience throughout the year.

For countertops, consider surfaces that are easily cleaned and that won’t readily show burn marks if hot pots get put down on them or show stains if something is spilled on them. Choices include:

  • Granite is always a good choice (we are the Granite state after all), but since granite gets hot in the sun, use it in shaded areas. If you must use it in the sun, choose a light color.
  • Quartz is another popular choice for countertops in indoor kitchens, but it will yellow in the sun and can’t stand up to our freeze/thaw cycles, so damage can occur.
  • Concrete is a good option and can be beautiful, but keep in mind that it needs to be sealed every couple of years.
  • Soapstone is beautiful in kitchens, but it scratches easily, and any oil will leave a stain.
  • Metal will be too hot to use as a countertop outdoors, and with our humidity and snow, will corrode quickly.

For cabinets, consider building cabinet frameworks out of stonework or masonry that matches your existing masonry or tiles. You can use stainless steel doors and cabinets that are nestled right into the stonework. If you prefer wood, there are many options that work well outdoors too.

At Stephens Landscaping, we’ve helped many homeowners design and plan their outdoor kitchens. We’d love to help you, too. To get started, call 603.707.0630 or email us!

Getting Into the Holiday Spirit

Garden Center

The holiday season is upon us! While New England can look perfectly picturesque under freshly fallen snow, you can add to the charm of the holidays and winter season by adding a festive touch to your home—both inside and out.

No matter what holidays you celebrate, you can add a cheery charm to your home by bringing a little bit of the outside indoors with thoughtfully designed pieces of décor and a comforting, warm glow through your lighting design. Home exteriors and landscapes can look beautifully luminous decked out with greenery and a mix of ribbon, berries, twinkle lights, with loose boughs or arrangements in varying sizes.

This time of year, when the leaves have fallen from the trees and there may (or may not yet) be snow on the ground, the lack of color can be a bit, well, dull. The easiest way to bring color and a bit of nature into and around your home this holiday season is to decorate with fresh greenery.

Decorating Outside

Wreaths and baskets on a front door are traditional holiday décor, but you there are many ways to customize these items to make it your very own, and better fit with your home’s design and surrounding landscape. Of course, you can match the ribbon to your door color, add a ribbon of your family’s tartan, hang a wreath or basket with your family’s name written on it or on the hanging ribbon, use two or three smaller wreaths or baskets instead of one large one…there are many possibilities!

The outdoor entrance lights installed next to the front door are great places to hang wreaths or garlands that match or complement the wreath on the entrance, as are any lamp posts that flank the walkways around your property. Adding large bows to the greens can add a nice pop of color to your outdoor space.

A beautiful way to illuminate your home for the season is to weave weather-resistant, battery-operated light strings into wreaths or garlands that are hung on the outside of windows. They’ll bring a festive glow to your home and the surrounding landscape for the holidays. Adding window boxes filled with mixed greens, red berries, ribbons, and tiny lights are another way to include your windows to your holiday decorating plan.

Indoor Décor

The holiday season is a social season. It’s the time of year when we spend the most time with family and friends, with many people hosting or attending parties and open houses. It’s the perfect opportunity to decorate your entire home from top to bottom, and the possibilities here are almost endless. Every room can get into the holiday spirit with a little greenery and accent lighting.

The kitchen and dining room are great places to incorporate some greenery-based décor. Garlands strung with lights and intertwined with fruit and berries look great on top of kitchen cabinets and laid out across tables, extending from holiday centerpieces. Sprigs of greens, berries, and pinecones tied to chair backs add a festive touch to a dining room.  And, arrangements of all shapes and sizes can complement your aesthetic.

In other parts of the house, garlands surrounding artwork, mirrors, and fireplaces can add a pleasant focal point to a room. Small arrangements interspersed with statues and/or candles and lights, and thoughtfully placed on bookcases, tables, and bureaus add to the overall charm of your holiday décor.

Candles are an indispensable part of many holiday celebrations, and it’s easy to add a bit of greenery and colored ribbons to candelabras to match with your family’s observances. Candles create such a warm glow adding a holiday ambiance to a dark winter’s evening.

And finally, kissing balls are a traditional holiday favorite, and can be used in both indoor and outdoor designs—they look great hung on a doorway lintel, from a chandelier, above a fireplace mantle, in front of a mirror, and outside near a front door, on a porch, on a driveway light pole, or even on a mailbox.

Getting Creative

At our Garden Center in Moultonborough, we have greenery and arrangements ready for purchase. We’re also happy to work with you in designing something that’s just right for your home. You can also bring in your own planter or container, and we’ll create a stunning piece for you. If you’d prefer something already premade for your home or for gifts as you visit family and friends this season, we carry many beautiful arrangements of varying size and design from which you can choose.

Our new holiday hours at the Garden Center are: Monday through Saturday 9 – 5, Sunday 10 – 3 from November 22 – December 24. Please call the Garden Center at 603.677.9100 or reach out if there’s anything in particular you’re looking for or would like custom designed by one of our creative team members. And, of course if you’re in need of assistance preparing your landscape for the holidays or winter ahead, let us know. We’re here to help!

Keeping Your Driveway Snow & Ice Free

Landscape Construction

Winter is a wonderful time to enjoy all that New England has to offer. Our abundant snowfall allows for all sorts of fun outdoor activities. But with the quiet beauty of snowfall comes something less enjoyable: clearing driveways and walkways full of snow.

Wouldn’t it be nice if you didn’t have to worry about clearing your passageways at all? You can have a driveway and sidewalk that stays clear of snow and ice by installing a radiant heating system under their surfaces. Many new houses are built incorporating heated driveways into their design, but installation can be done at existing homes as well.

Heating System Options

There are several options available to keep your driveway and walkways clear of snow: portable mats, a hydroponic (hot water) built-in system, and an electrical (wire grid) built-in system. We breakdown these systems, including installation details below:

Portable mats: These are the easiest and least expensive to install. It consists of portable mats that you lay down before any storm, wherever you want to keep snow from sticking and piling up. They come in a multitude of lengths and widths, so you can purchase mats to best fit your space requirements.

These are a good way to try out a heated driveway before committing to the time and expense of an installed system. The downside is that these mats must be placed before the snow comes and removed after the storm. They should be stored somewhere before the next use.

Hydroponic systems: If you are having a house built, the ideal time to install this system is before the driveway or walkway is laid. If you are adding this to an existing property, the driveway or walkway will have to be torn up, system installed and passageway redone.

This system uses tubing that is installed under the surface of your driveway and/or walkway. A warm, non-freezing water solution gets circulated through this series of tubes, and this solution is heated by a boiler that is usually located in the garage. This system is controlled by an automatic sensor or can be controlled manually. The driveway is then laid on top of this tube.

Electrical (wire grid) systems: Like the portable mats, these are a series of electrical wires that are meshed together in a grid pattern. These mats are embedded into the soil beneath the driveway, then paved over. Again, this is best done before the driveway is laid, but can be done to existing driveways if the driveway is torn up. Grids can be connected to cover the driveway completely, and this system is also controlled by a sensor that can be controlled manually or automatically.

Things to Consider

Apart from the initial purchase and installation costs, you should also be aware that heated driveways and walkways will incur operating costs each year as well. The boiler for the hydroponic system will use additional electricity or gas (however you heat your home) and the electrical grid system will increase your electricity usage.

If you install the hydroponic system, you’ll need to have the boiler inspected each year before the winter season begins, to keep your system in the best working order. While each system will likely give you 20 or so years of use, like any other mechanical system, breakdowns do happen, and you may need to do small repairs and maintenance over the years. If something really goes wrong, you may need to tear out part or all your driveway or walkway to repair the problem.

However, in weighing the pros and cons, having a heated driveway/walkway system to combat the snowiness of a typical New England winter is an absolutely excellent idea. Installing a heated driveway and walkways are wonderful ways to ensure the safety of your family and your visitors around your property this winter and will take away a lot of worry and fuss. You won’t have to find and rely on someone to plow and clear your property, and your driveway will be ready for you whenever you need to use it. You’ll increase the life of your driveway by not exposing it to great variations in temperature, or by being scraped by snowplows and shovels or corroding chemicals to melt ice and snow. And, you’ll increase the property value of your home.

We’d love to discuss the possibility of adding a heated driveway/walkway system to your home. Contact us, or give us a call at 603.707.0630.

Permeable Power: Benefits of Permeable Paving

Landscape Design

The pathways, patios, and driveways around our landscaped yards and gardens are often semi-neglected strips of land that deserve their own care and attention to detail. You may be pleasantly surprised to learn that there are more eco-friendly options available today which not only improve the visual aesthetic, comfort, and safety of these passageways, but can also be beneficial to the environment.

Simply defined, permeable paving is the setting of porous paving stones in sand and gravel, and adjusting the size of the gaps between to allow for water to drain into a crushed stone base below. Permeable paving has been used for roads and paths for thousands of years, but in the past century or so, has fallen out of favor due to the increased popularity and ease of laying down impervious coverings such as blacktop asphalt or concrete.

How are permeable pavers considered “green”?

Consider what happens when it rains on asphalt or concrete: The rain comes down, and water pools on the surface because they are impervious. Rainwater then makes its way to the edge of your lawn or out to the street, picking up any debris or chemicals along the way (like oil or drops of gas from vehicles, for example). This dirty water gets sent down the storm drain, and flows into lakes, rivers, reservoirs, and oceans.

Permeable pavers will act as a natural filter for this water. The water, instead of pooling on the surface of the paver and immediately running off, will instead make its way down through the crushed stone and sand layers. These sediment layers will both filter the water and slow down the rate of water going into the storm drains, alleviating the demand put on drains during heavy storms and lessening the chance of flooding.

You can up the “greenness” by installing a rainwater collection system beneath your pavers during installation, allowing you to capture this water for use in your yard or garden. There are also permeable paver stones made of recycled materials, that are eco-friendly.

Can permeable pavers make driveway or patio more comfortable or safer to walk on?

By installing more permeable materials in your hardscapes, you can absolutely make driveways, walkways, and entertainment spaces more comfortable and safer year-round.

Impermeable materials, such as blacktop or densely packed tiles, not only trap water but also heat. Have you ever tried to walk barefoot across a driveway in the summer? If you have, then you likely quickened your pace because the surface was so hot. During the winter, when the snow melts and the water freezes, it’s common to find icy patches on driveways and sidewalks, which can be dangerous for household members and guests.

However, because permeable pavers are porous and allow water to pass through them, they stay naturally cool in the summer, and safer to walk and drive on in the winter. The water drains from the surface and through the joints more quickly, and does not rest on top of the pavers themselves allowing for fewer icy patches and less safety hazards in your passageways.

Questions? Please ask!

We have years of experience in designing and installing permeable pavers, and would love to discuss your project and ideas with you. There are a wide variety of permeable paver styles available to complement your home and landscape. We will work closely with you to design and implement plan that best fits your space, design aesthetic, and budget. Contact us, or give us a call at 603.707.0630.

Additional Resources:

UNH Stormwater Porous Fact Sheet

UNH Stormwater Pervious Concrete Fact Sheet